
Strength By Fitness
Equipment needed for our Bodyweight, outdoor gym focused fitness plan. 1 Backpack with rocks, or other weight items, Resistance Bands, pull up bar/branch, dip station, boxing bag, running shoes, truck tire/big rock.
Effective, fact-based home gym plan that rivals a commercial gym from Strength by Fitness.
Not all clients are 100% set in their all-year-round gym habits. As such, some of them will want to train outdoors at times, while others will annually end up spending weeks and months in their summer house or similar with no proper commercial gyms nearby. But this is perfectly fine, and you can maintain and even build strength, health, and fitness with an outdoor gym and bodyweight focused fitness plan if you just know how to plan and execute it properly.
Welcome to a proven, and fact-based bodyweight, outdoor gym based fitness plan from Strength By Fitness.
This is day one of our 2/3 day strength training Per Week: Bodyweight and outdoor gym Plan.
Aerobic exercise sessions are listed as optional, but for optimal health & fitness, please do 2 to 4 aerobic sessions per week, after your RT sessions or during your strength training-free days of the week.

A logg can be turned into a heavy ass barbell, and a backpack with rocks add tremendous load to many exercises.
Coach Mike, Strength By Fitness
If the summer house is calling for your attention, and there are no commercial gyms nearby. Invest in a pack of resistance bands and perhaps even a TRX band. This is all you need to buy, together with good gym straps. Once done, bring your bodyweight to easily maintain or even add quite some strength and fitness capacity.
If you want to build upon that affordable base you can with a touch of creativity, and a log create your own tree trunk based heavy ass barbell.
You should also fill a sturdy backpack with a suitable amount of rocks because this will add tremendous weight to any bodyweight exercises such as vertical, and horizontal pullups, dips, JM presses, full rom step ups, sissy squats, lunges, you name it.
That rock-filled backpack is your commercial gym in one small, and very versatile tool. Yup, it will make you look at bodyweight exercises in a whole new light. And quite possibly never return to that commercial gym of yours. That's how good it is. Well, you should still work with your all-year-round coach, of course, so there´s always that :).
But, in the case of all-year-round coaching led by actual humans, well, you always have Strength By Fitness since we work with clients from around the world, on location as well as online.
There are also properly weighted vests you could invest in if you have the budget for spending. But the backpack being stuffed with rocks works just as well.
Best of all, you can adjust your weight downward when needed and even use it as a super comfy dumbbell and do all unilateral dumbbell exercises you can imagine, such as lateral raises and curls.
From backpacks to flipping wheels, effort and momentum.
A big wheel from a truck or tractor ( local farmers would probably be happy to give you an old worn out one ) is an amazing full body deadlift esque movement pattern tool, and as a bonus flipping that wheel will work more than just the deadlift pattern since it turns into a push exercise halfway up.
That is, if you dare to go from the deadlift phase of this movement pattern to actually trying to flip the wheel. I am not saying that as a dare, I am mentioning it because that's the most injury-prone part of the lift due to your upper arm muscles and tendons having to face off with the mighty weight and mass of that wheel.
A sturdy tree branch can make for a great pull-up station. So all that you might need as a gym machine might be a good ol tree.
And of course, you can deadlift and flip a big ass rock instead of a wheel, or why not use old school farm metal milk containers as dumbbells, and create a weighted sled for push/pull exercises out on the lawn.
And that log, it can be used as a carry yok too. Boom.
Who said that you need the fanciness of a commercial gym to build strength, explosive athletic muscle mass, and athletic capacity?
If you are lucky, you might have a municipal outdoor gym nearby; if so, make use of it too. It is a great, free gym resource. So do not dismiss those contraptions and slightly weird-looking machines they have built. Give it a view and some thought, and I am sure you will be able to replicate a ton of commercial exercises.
Outside of strength training 2 to 3 days per week at home or with your nearby outdoor gym, don't just finish some of those strength focused workouts with a little bit of aerobic training; also add one or two days of aerobic exercise during your non-strength training days, if you have the time and energy.
It will not impede your results, and that combination of strength training and aerobic training is far better than just lifting weights or running could ever be on their respective own.
Finally, let's discuss momentum & isolation.
There are many aspects and variables to this entire, endless conversation.
So I will cut to the chase, and keep it very brief.
There are easy recovery benefits from keeping momentum down, and doing exercises strict and controlled. This is very true, and incredibly obvious to anyone who´s working with fitness, sports, rehab, recovery, and exercise. So, always keep whatever exercise you do within the realm of remaining injury-free.
There´s no progression or health benefits from getting injured all the time. So, if you keep running into bad wear, and tear, and injuries, reassess what you are actually doing and take it down a notch or two.
With that said, plenty of influencers, gym coaches, personal trainers, and physical therapists are far beyond the realm of common sense when it comes down to the mind muscle connection, and isolating movements in an endless quest for technical perfection and injury-free training.
To the point where I would call it artificially limiting performance and health out of a fear of effort.
Why am I saying that?
Because I have worked with hundreds of long-term in-person clients, and exponentially more short-term clients, online, and in person. I have worked with teams and classes too, I have known, and collaborated with many coaches, personal trainers, physical therapists, pro athletes, and other professionals in our field.
I have worked at several studios and gyms, and I have owned gyms.
Keeping injury-free and fit should be the real priority.
And guess what?
First of all, hypertrophy has a fairly "low ceiling"; I would not call it easy to max out.
You can build muscle mass for the rest of your life without maxing it out.
But you will reach 98% of your biological max after a handful of years, or a decade or two of serious, perpetual exercise, no matter how strict you train, and with no difference between your approach between rep ranges, big or lighter loads, or it being isolation exercises or big and heavy, aggressive compound moments or not.
Either way, everyone who trains good enough and regular, while eating for it, will more or less max out their own capacity for hypertrophy.
So, there´s no need to make hypertrophy your main priority for all of life. It's the "free" outcome that's inevitable if you lift weights every week in a good enough way, assuming you also take care of your nutrition.
Case in point, people like me or Jeff Nippard.
We both train all year round and have done so forever, 3 decades and counting for myself, and 15 or so years for Jeff Nippard. I am, of course, still making progress, but the lean mass progress is so small and slow that it hardly even matters. I mean, by now, it's maybe possible to add 1 kilo of lean muscle mass in a year of perfect training. So yes, that doesn't require hypertrophy-obsessed exercise. It just requires injury-free and persistent fitness and strength training.
My health and physical capacity, however, is all about my weekly fitness level and habits being maintained. And that physical level can be progressed and improved upon for all of life.
So, max out your lean mass by focusing on health, strength, cardio, speed, movement pattern capacity, and physical athletic capacity.
With that said, keeping injury-free should always be your priority.
You just don't have to rob yourself of your body's actual movement pattern and physical capacity in order to max out that lean mass potential. Do it while also building superior physical capacity and movement.
This approach will build a healthier and far fitter you. And isn't that really why you exercise? To actually be as healthy and physically capable as you look?
If it is, the answer is to train strict enough to remain injury free, while allowing enough momentum and explosive contractions across the real full range of motion and movement of an exercise to unlock your real strength and movement capacity.
Gym Day 1
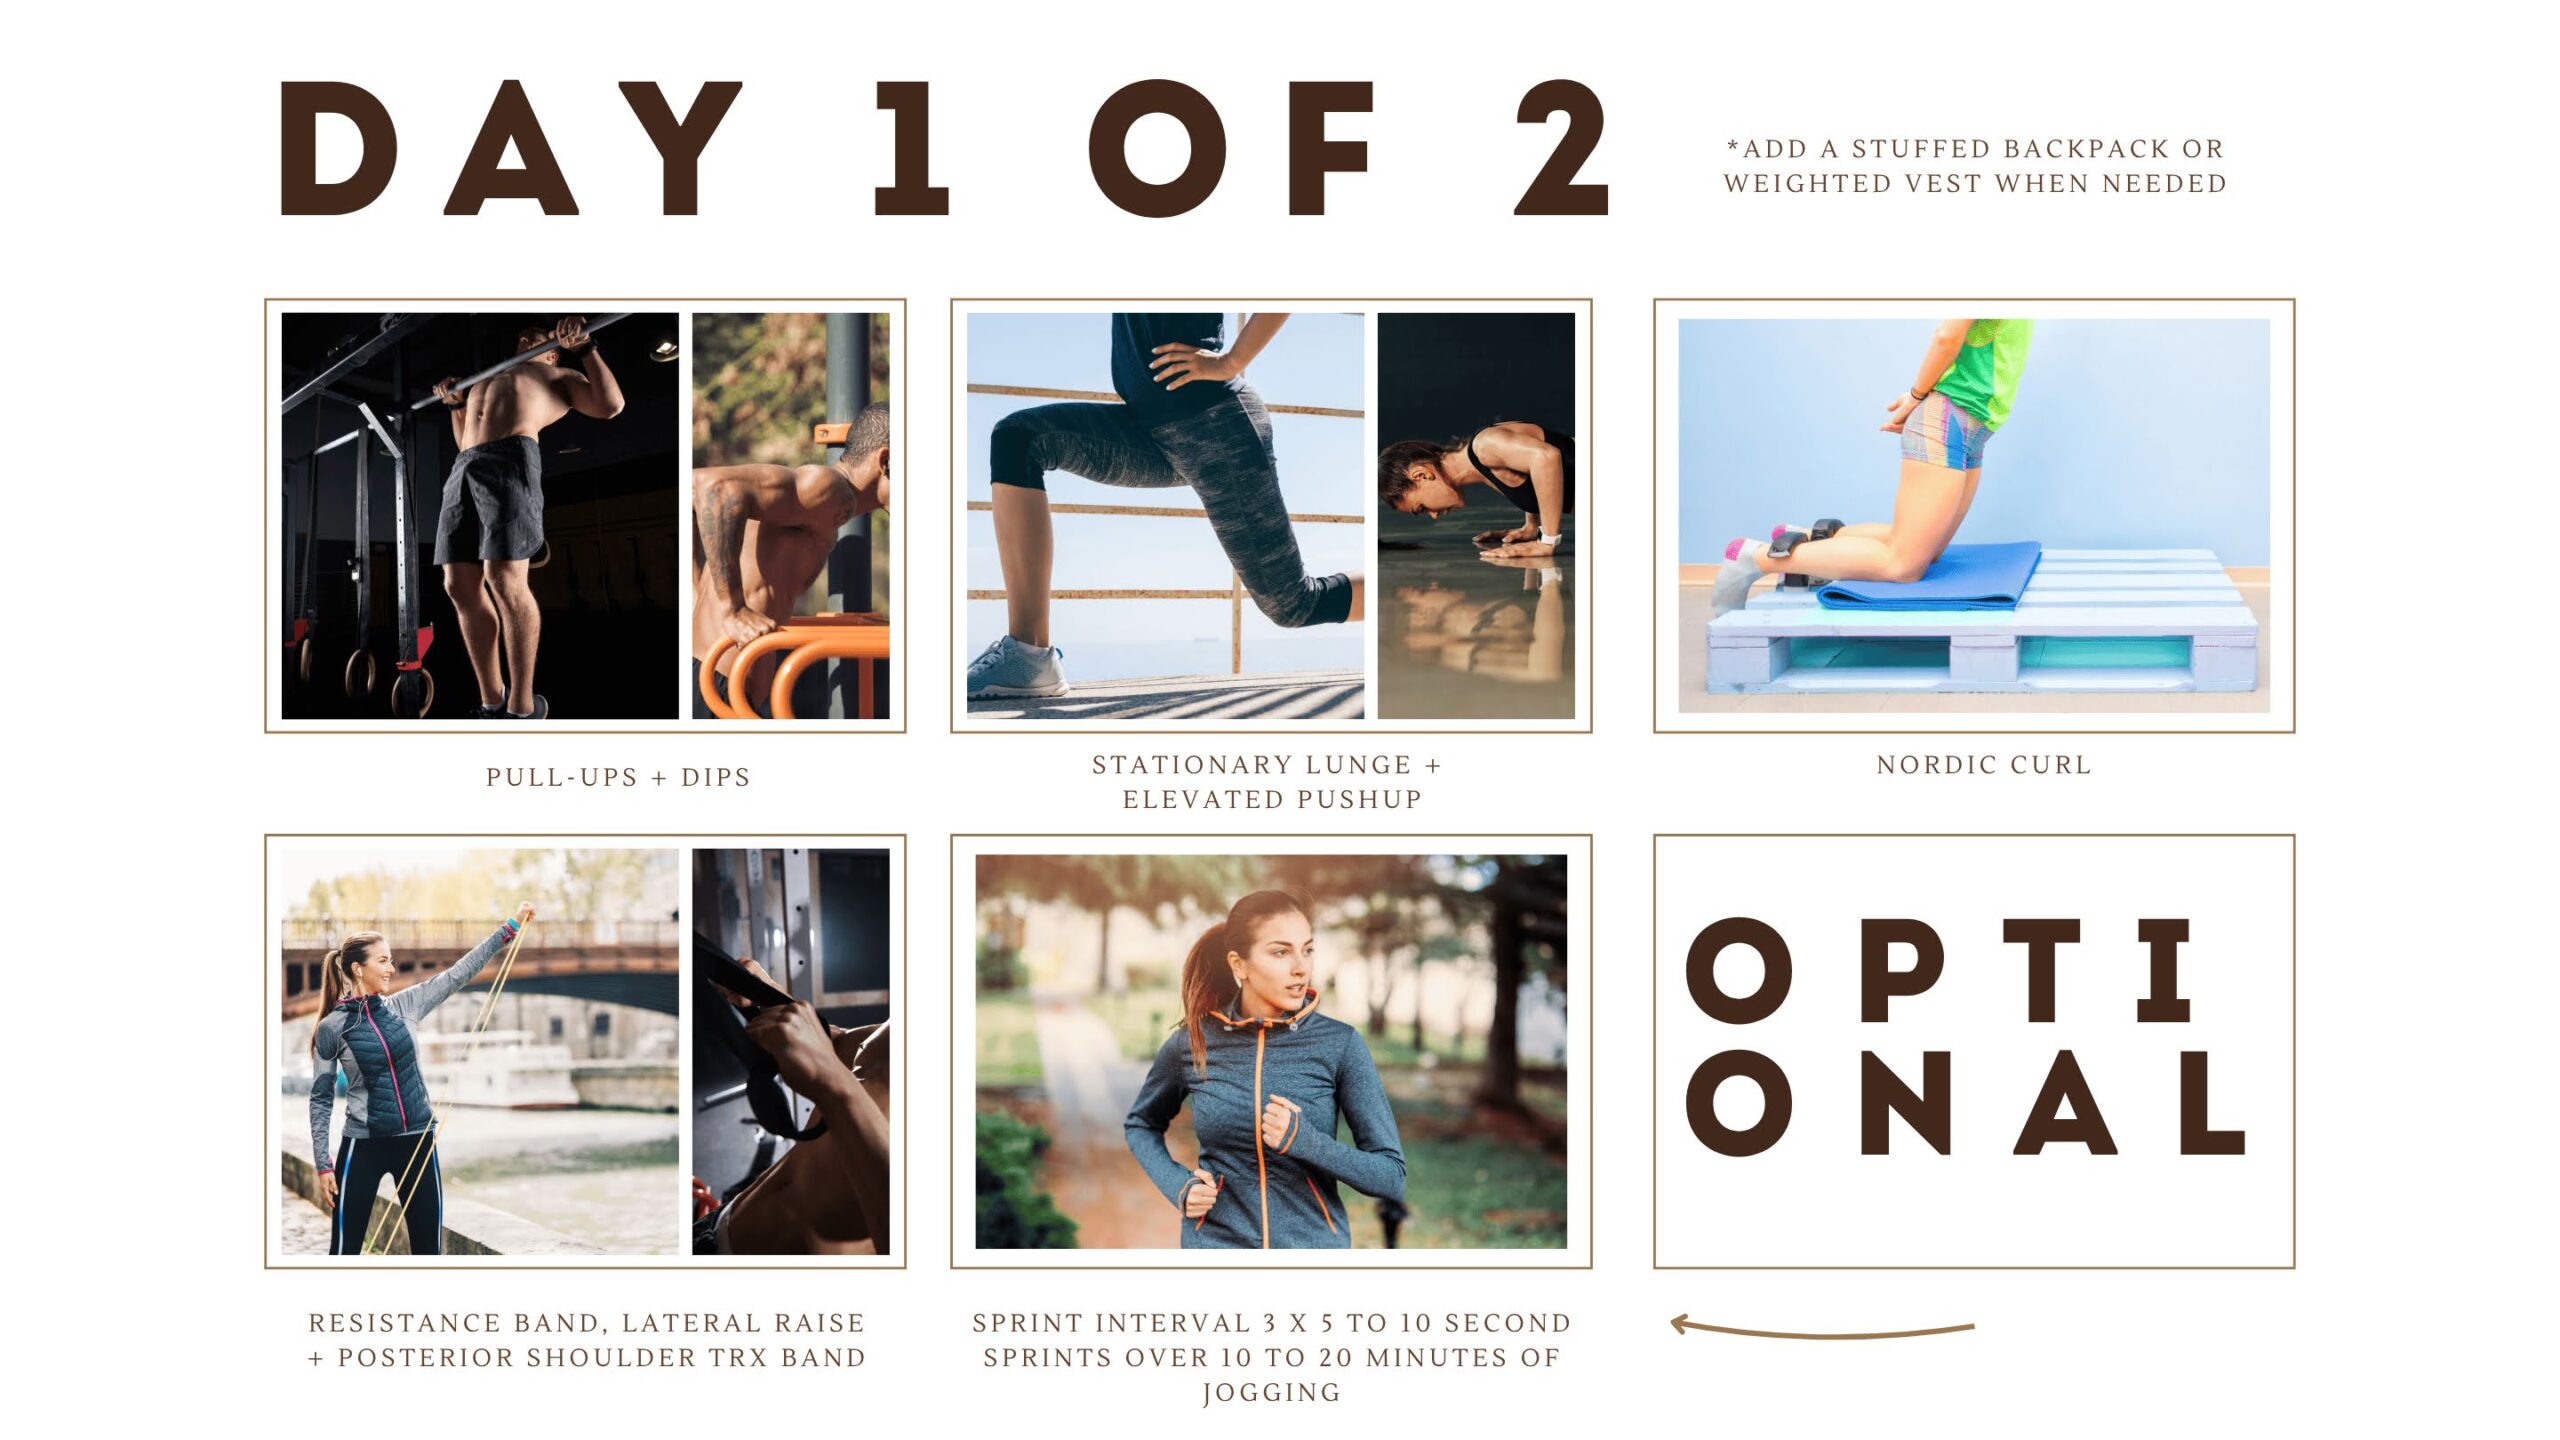
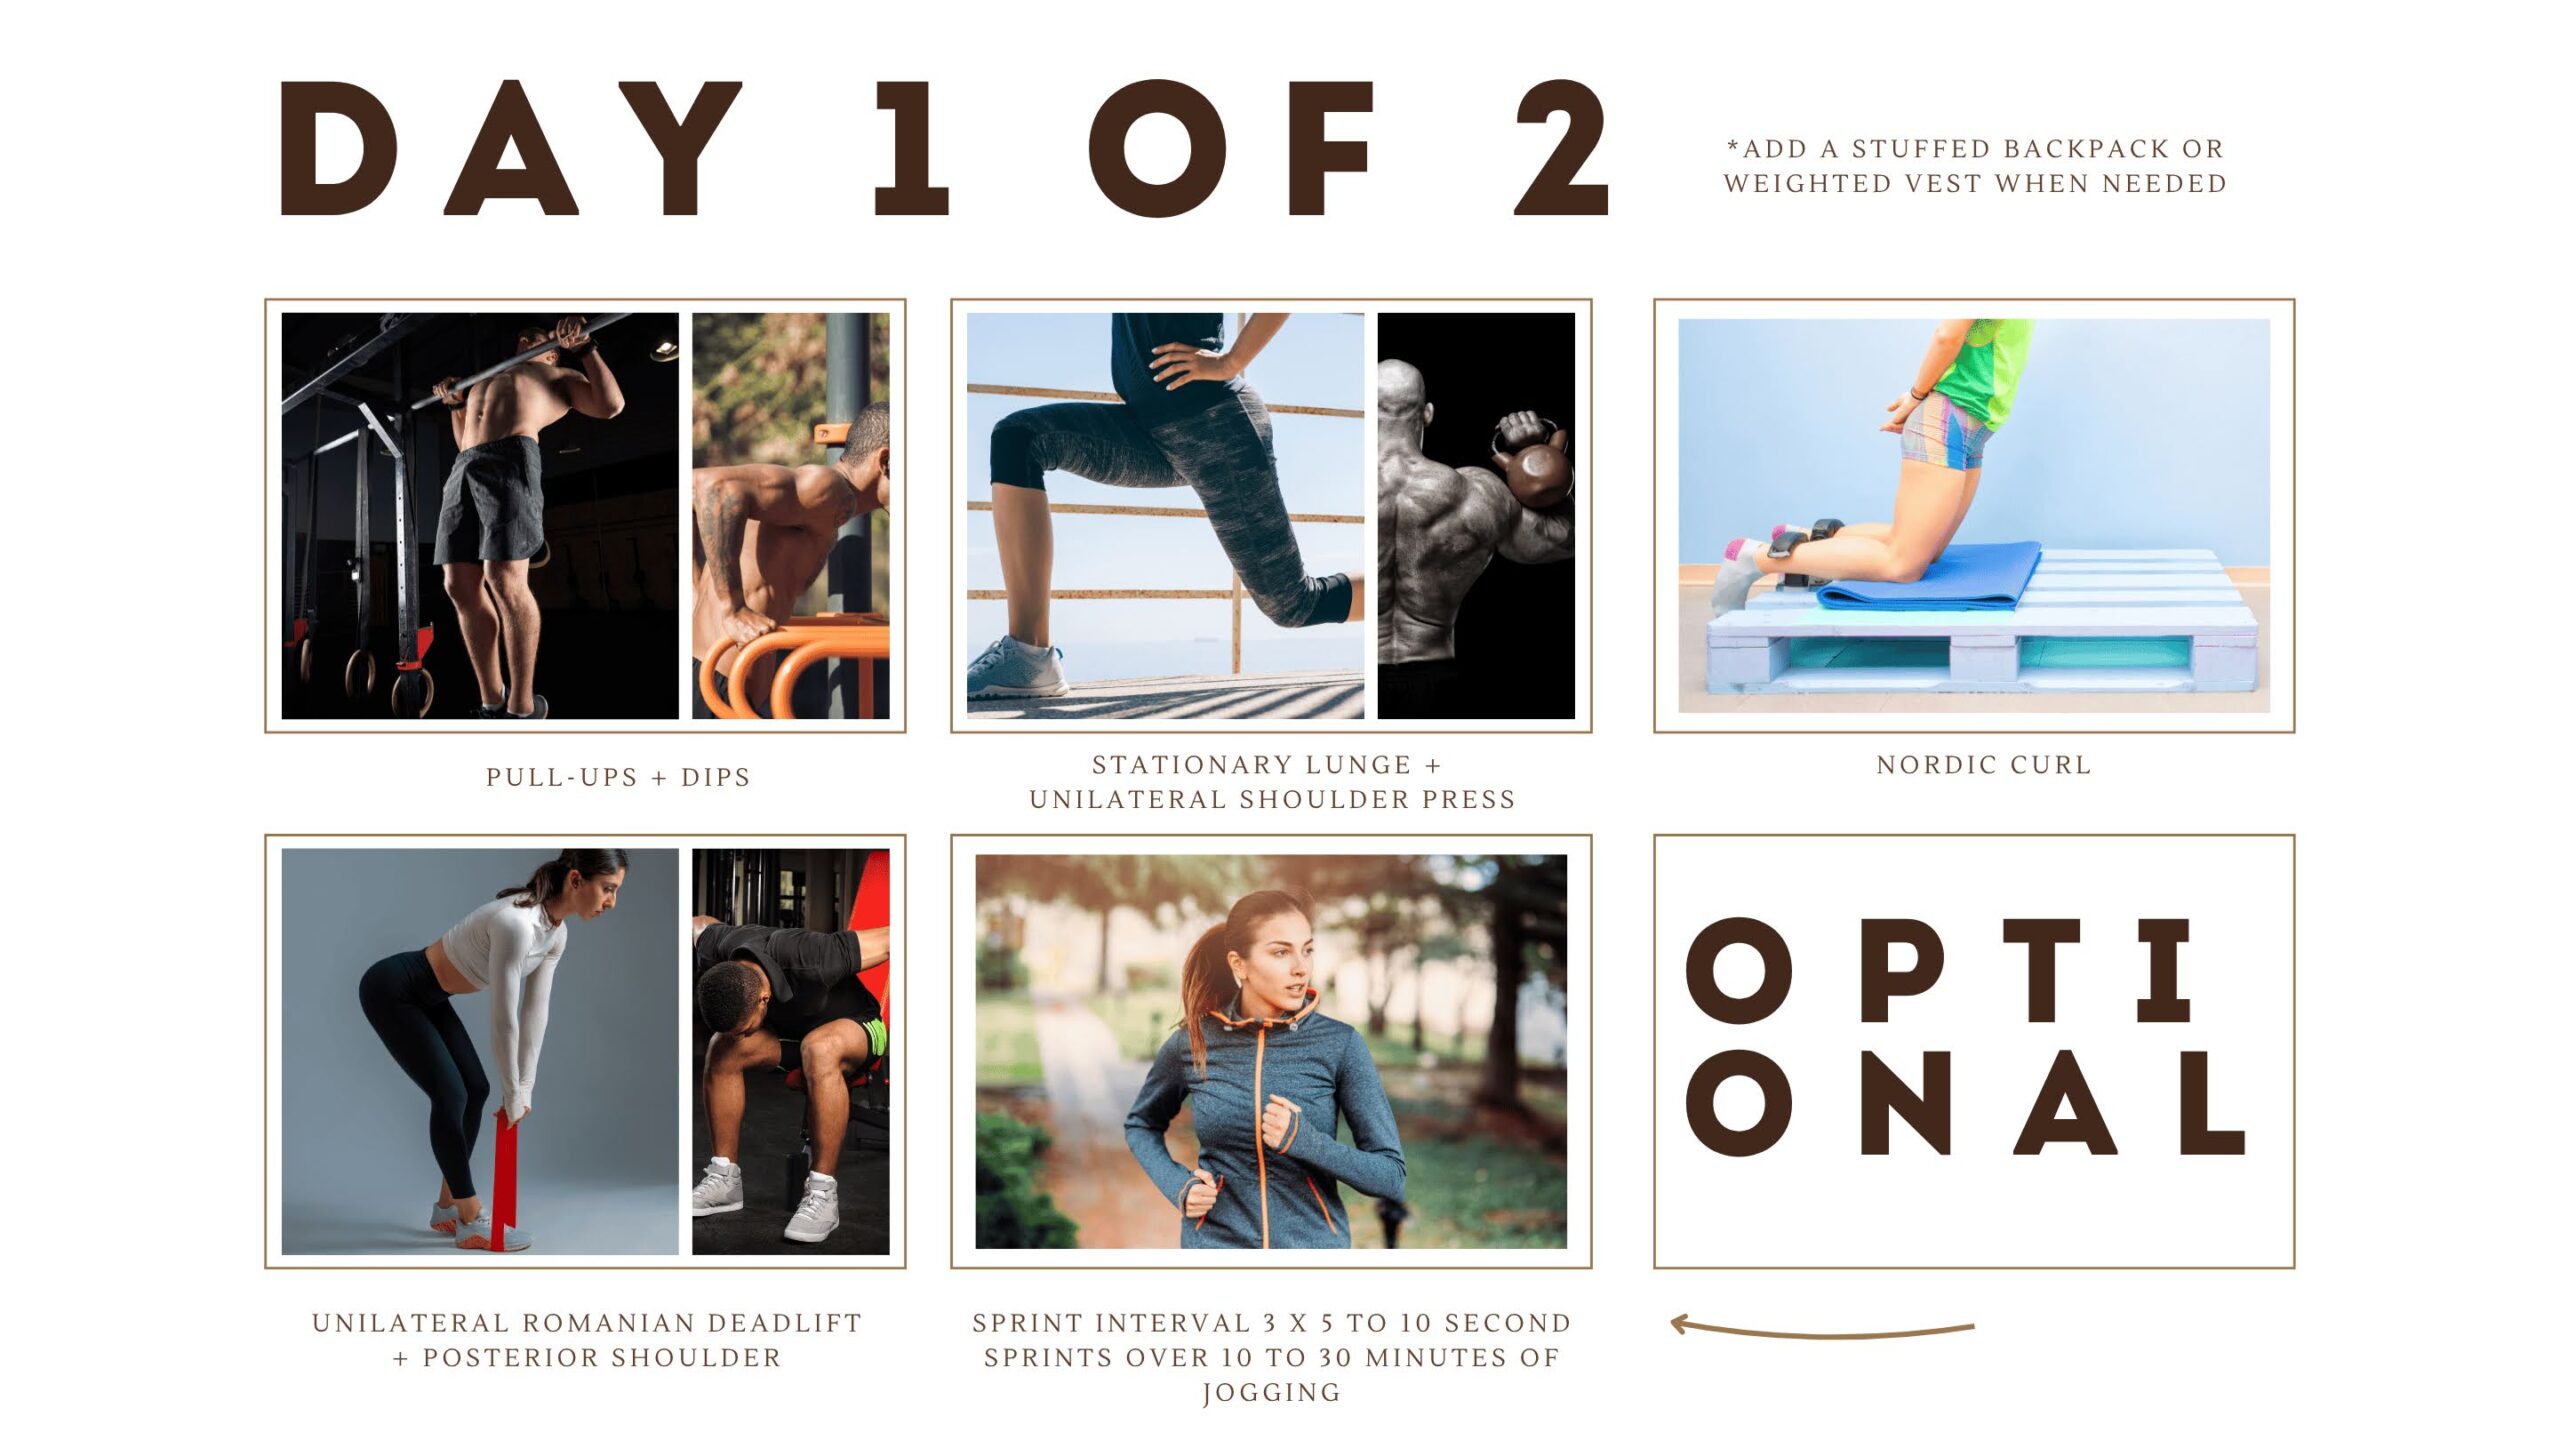
Super Set Group 1
Vertical Pull Ups
3 set
RIR 0 to 4
Dips
3 set
RIR 0 to 4
Rest time between each super set.
2 to 6 minutes
Some Coach input on the exercise selection, load, RIR, and cues for group 1, day one.
Pull-ups and dips are both massive compound exercises that stand on equal terms with any barbell compound movement.
Sure, they are not as easy to progress with additional load at first sight. But not only do both of these exercises work several muscle groups at the same time as agonists, and many more as antagonists and stabilizers, but you can easily add load to them just as you do with a benchpress, squat, bent over barbell row, seated row, or pulldown.
And as you almost always should choose to do, we start day one with the two biggest exercises because we are at our freshest, for the week and the day, this gives us this nice fitness equation of the most bang for the buck. And unlike with the tire flip on day three, you can easily add ever more load to these exercises if you are strong enough, or ease up on the load with the help of resistance bands underneath your feet, or a friendly workout buddy.
This means that you can progress your load for each set if you need to start with an easier warm-up set or two.
As always, when you are working with supersets, rest as much as you need between the two exercises in the actual super set.
You do not have to go from exercise 1 to exercise number two in the blink of an second. Take a 10 to 60-second breather as needed so you can perform exercise two with the proper effort and performance, too. Once exercise number two is done, you then take your full rest pause for anything between 2 & 6 minutes before you do your next super set for that exercise group.
RIR 0 to 4.
This is a wide range, but it also happens to be the single most useful RIR range to train in, no matter if you are looking for strength and power progression or hypertrophy. No, you do not need to reach RIR 0 to tap into hypertrophic benefits, and you do not have to avoid RIR 0 if you are looking to build serious strength.
Instead, consider the entire RIR 0 to 4 range as a really good set. If you are fully loaded with energy, and you recover well in between sets, joints, and tendons feel fine, go closer to RIR 0 even for set 1. If you need a set to work yourself up towards a bigger load or RIR 0 effort, RIR 4 is your non-exhaustive friend that will still deliver great progression over time.
In the final work set, set number three for this exercise group, go for that RIR 0 set and bring out your to-the-wall effort.
Load, bodyweight, and higher.
Now, even tho we are not doing this fitness plan in the comfort of a commercial gym with the ease of life thats barbells, weight plates, dumbbells, and machines, you can fill that backpack with 0 to ~40 kg of rocks, or 10 kg if thats a more suitable load for you, once you are crushing 8 to 12 controlled, full range of motion bodyweight dips, and vertical pullups.
But start with the basics, it's hard enough for a lot of folks to do a single bodyweight pullup. So start with that, and if needed, make use of a resistance band or two under your feet to make the weight slightly lower.
Unless you have a trusted workout partner who can lightly spot you by lifting a little under your knees.
Once you can do 8 to 12 controlled, full rom pushups and dips, you can start considering adding weights to your backpack or weight vest and take exercise group 1 to a whole new level.
Coaching cues, pullups, and dips.
Pull-ups are the first trial by fire for our day 1 in this bodyweight, outdoor gym fitness plan.
Start and stop in the same fully lengthened position, straight arms above your head, a fully lengthened scapula, and lats.
You do not have to pull with a perfectly still body and a perfect vertical pull.
You can swing with a bit of momentum, and you can have your feet straight down, or slightly behind you, and you can pull your chin close to the bar, above the bar, or go further and pull the bar to your collarbone, or even to your chest bone.
It all depends on how strong and athletic you are.
But whatever you can do injury-free on a consistent weekly basis is the baseline for you, and from there, you work your way to a complete pullup.
Use resistance bands under your feet if you need some slight assistance to complete the pull-up. A solid workout partner that's holding gently beneath your feet or knees works too.
Muscle activation for pullups is primarily the lats, upper back, rear shoulders, lower arm, and the biceps. In-person clients know that I am a big fan of doing each set as a cluster set.
This means that you use a bigger load, and even tho your total rep volume in that set will end up being 8 or 12, or even 15 reps, you do 1 full-on effort rep at a time.
Breathe in, and power up for a few seconds before you do the next repetition. This way, you are basically doing several 1 to 5 RM lifts per set, despite doing a total of 8 to 15 or something reps. You can do all your reps in a unbroken traditional way; this works great too.
There are many ways of training.
But I love the cluster set approach I am using for my personal fitness life, and it´s worked amazingly with every client I have tried it on over the many years I have been coaching.
It's not for everyone, but it works incredibly well.
I am mentioning this because, as the video below will show you, pull-ups are a perfect exercise for this type of set approach.
Dips.
This is another massive compound exercise that will directly work your triceps, chest, and shoulders in a bench press level way. If you are a champ at crunching out full range of motion dips and you can do 12+ bodyweight dips, its time to fill up that backpack, and work your ass, with benchpress type loads.
I don't care if you lean your upper body slightly forward or if you keep your upper body perfectly vertical.
What this does is change the percentage of muscle activation around a little. If you lean your upper body forward, you will engage your chest a little bit more.
The important thing to keep in mind is that every variant is ok as long as it feels pain-free for you and does not end in injuries.
As such, go as deep as your shoulders can tolerate, and if needed, brace at the bottom by gently pushing your feet against the ground or exercise station.
Control the negative, and make use of a lengthened bottom phase for ~ roughly a second or two, and push explosively back up. Breathe in at the top, and do the next rep, breathe out when you push up from the bottom.
It doesn't matter if you are keeping your feet straight down, bent behind you, or if you have your knees slightly bent in front of you.
Try it all and find out what's best for you.
As for your dip hand position, try to keep them at the center of your body, or slightly forward; this makes for a much nicer internal rotation in your shoulders.
Placing your hands behind your body does the opposite, and while this is perfectly fine for some people, it is a frequent contributor to shoulder discomfort for many others.
Finally, line up your elbows, wrist, and shoulder joint in a nice vertical line; this not only makes for a nice and strong dip position, but it also makes for a high level of triceps stimulus and keeps your elbow and shoulders happy.
Some vertical and lateral spread is fine, like with every other exercise on the planet, it's not about every single human being making use of the exact same execution, you have some leeway thats uniquely individual for you.
Muscle activation for dips are primarily triceps, shoulders, and chest.
.

Super Set Group 2
Stationary Lunges
3 set
RIR 0 to 4
Elevated Pushups
3 set
RIR 0 to 4
Rest time between each super set.
2 to 6 minutes
Some Coach input for exercise group 2, day one.
Stationary lunges and elevated pushups make for two more compound movements that can only be described as two very powerful body weight exercise choices. Best of all, thanks to your weighted backpack, you will be able to progress these two for decades to come with no need for a commercial gym in sight.
First off the bat are the stationary lunges.
If you are not compatible with this movement pattern, try the full range of motion step-up instead. It´s basically the same stimulus, and they are both just as good as the other.
No, they are not carbon copies, but if, for some reason, you just can't do one of them, the other makes for a perfect replacement.
RIR 0 to 4.
For this exercise group, RIR 0 to 4 still works perfectly fine, but your lower body really progresses nicely when you push it, so if you have the mental fortitude, go for that RIR 0 to 1 set and bring out your inner Viking warrior with every set during the lunges.
Load, bodyweight, and higher.
Your lower body is both mightily strong and very durable, so pack your backpack and do our stationary lunges weighted right from the get-go, unless you have mitigating issues that make the bodyweight version challenging enough as it is.
5 to 25 reps is a perfectly fine rep range here, and if you can honestly reach that 0 to 1 RIR with a 15+ rep range, that will build both strength, muscular endurance, athletic capacity, cardiovascular health, and lean muscle mass.
But I would recommend just adding more load and keeping it between 5 and 15 reps for most. It's just easier to train within that rep range to exhaustion.
If you can load it big enough to keep your rep range below 15 reps.
Coaching cues, lunges.
I am calling this one stationary lunges, but if you prefer doing your lunges in a walking pattern, that's just as fine.
I prefer teaching clients the stationary variant, however, for one very simple reason, if it's stationary, you can use a hand against a machine, or a wall for balancing support, which allows you to safely load the exercise even more. And that's what we want: more load, more effort, more exercise-induced adaptation, and progress without increased risk.
So, for most people, the stationary lunges make for a better choice than the walking version.
Shoulder-wide square stance, ie, feet apart laterally with one foot forward and one behind you.
Slight knee bend on your rear leg, and your front leg should be positioned in such a way that your foot and knee are slightly in front of your body.
Some people prefer to do this exercise with a straight upper body, while others feel much better by hinging their upper body slightly forward over their quads and knees.
Both variants are perfectly fine, experiment and find which one feels the best for you, from both a performance, stimulus perspective, as well as what feels best for your knee.
Yes, actual muscle activation changes ever so slightly depending on how you keep your upper body here. Try it out and feel the difference in stimulus yourself.
Drive your force through the toes and heel of your front leg, like with squats, it just doesn't matter if your knees are over the midfoot, your toes, or going slightly beyond your toes.
Go with what feels the best for you; it's all safe and fine.
Muscle activation is primarily the gluteus and quads, but since it's one leg at a time, there's some quadratus lumbarum activation and some core too. But the primary muscles are the quads, hamstrings, and gluteus muscles.
Elevated pushups.
Another mighty fine compound exercise.
Regular, all-year-round gym goers like myself usually overlook the pushup in our regular fitness plans, it's after all much easier to grab bigger dumbbells or load up the barbell even more than to go through the trouble of having someone add an entire mountain of plates on your back while doing pushups to reach the same total load with the same rep range.
But when you have no gym nearby, or at least no access to a proper bench, dumbbells, and a barbell with enough plates, the mighty pushup is a wonderful compound exercise for your chest, triceps, and shoulders.
Thanks to the backpack, you can also load it up quite nicely without building a tower of plates on your back. 20 to 40 kg should make it a great deal more challenging if you are running through regular pushups like butter.
And perhaps you can even push it higher in due time.
I am calling this exercise elevated pushups because putting your feet higher up on something makes it even harder than regular pushups. It forces you to lift more of your bodyweight.
Likewise, if normal pushups are too hard for you, you can do your pushups on your knees instead, or at an incline with your hands elevated instead.
A funny thing with elevating your hands, is that you can, as is visible in the video down below, make use of a slight hand elevation to increase range of motion for your push up, and as always, when we increase range of motion we make our exercises harder, which is great for our progression.
So, when you combine a slightly elevated hand position for increased range of motion with the elevated feet variant, you will have a very challenging push-up.
Load and execution are, as always, based on your relative need and capacity.
That's all part of your individual progression.
Hands beneath your shoulders, placed on the ground, straight body from head to toes, and if you can, place those feet up on something, off the ground; this already adds more load for your chest, shoulders, and triceps to handle.
Brace your core and gluteus so your upper body doesn't implode with your belly button trying to rest against the ground.
Ideally, it's chest lightly touching the ground, at the bottom, without resting against the ground, while your tummy is still floating up in the air.
Muscle activation is mainly in the chest, shoulders, and triceps. That's why you do this exercise.
But indirectly, your core is also involved, and to some degree, especially with added load, your gluteus, erectors, and scapula.
.

Exercise Group 3
Nordic curls
2 set
RIR 0 to 4
Rest time between each set.
2 to 6 minutes
Some Coach input for Nordic curls, day one.
Nordic curls are hard on the hamstrings. More so than the seated leg curl machine in the gym, for most folks anyway. As such, we are settling on just 2 sets taken to RIR 0-4.
Not to mention that hamstrings work overtime in sprint and run intervals, too. Keep your hands close to the ground throughout the entire movement instead of keeping them tucked to your chest as he does in the video.
Nordic curls for most people can end with an abrupt RIR 0 coming out of nowhere, so it's just nicer for your face and your hamstrings to be able to lightly catch yourself with your hands being close to the ground already.
Load, bodyweight, and higher.
Yes, the Nordic Curl is a bodyweight exercise, but it is one of the hardest bodyweight exercises out there, so only add load to your Nordic curls ( by holding a dumbbell, weight plate, or similar item, or putting rocks in your backpack ) if you manage to do more than 8 to 12 + strict full-rom reps.
Anything below ~5 reps with your bodyweight in this exercise needs more reps, and not more load.
Coaching cues, Nordic curls.
Brace your core properly, and fall with your upper body in a controlled motion toward the ground. Catch yourself lightly with your hands.
Let your upper body touch the ground, and if needed, push off lightly with your hands against the ground, as you curl your upper body back up to the upright top position with your hamstrings and glutes doing the job.
Do not hip-hinge your way down to the ground; it's your hamstrings that are supposed to do the work. So, try to keep a straight upper body with the biggest motion happening in your knee joint and not your hip hinge.
Muscle activation is primarily gluteus and hamstrings with some stimulus for your core and erector spinae as well.
.

Optional
Super Set Group 4
Lateral raise
2 set
RIR 0 to 4
Rear shoulder raise or row
2 set
RIR 0 to 4
Rest time between each super set.
2 to 6 minutes
+
An optional aerobic interval session once done with exercise group 4.
Coach input: Lateral raise & rear raise/row, day one.
Both the lateral raise and the rear shoulder raise, or meadows row, are superb exercises for not just your shoulder, but most of your scapula region too. You can further do the lateral raise with nothing but resistance bands, or you can take that backpack of yours, adjust the weighted items inside so you have a suitably high load, and crush those shoulder raises just as good as the biggest, baddest dumbbells at the gym would ever challenge you.
Load, from resistance bands to a packed backpack.
Resistance bands offer a very gentle progression, and it's easy to add more resistance by adding yet another band. Resistance bands are not perfect, but they're a solid option.
Once you get strong enough, you can always advance to using that weighted backpack of yours; using it as a dumbbell is nothing short of phenomenal.
Just grab it by the double back straps and you are good to go.
Does that really work?
Of course it does, when we are out and about, or I have no access to our regular gym, I have done plenty of rear and lateral raises like this with an easily adjusted load ranging from 20 to 40 + kg in my backpack.
So, no, you won't miss the dumbbell rack back at the gym.
Coaching cues, shoulder lateral raise.
Roughly speaking, take a shoulder-wide stance, with the opposite foot to the hand that's doing the lifting placed on the ground, in front of your body.
This makes for a much more stable position, so you can pull as explosively and as controlled as possible, no matter how big the load ends up being.
Brace your core properly, and stand tall and proud.
The hand that will do the lifting should start slightly over the middle of your body, so you are pulling a little in front of your body, instead of stopping against the side of your body.
Breathe in, and raise the weight slightly aggressively, but controlled in front of your body, to the side, with your hand going in an arch up towards the sky.
Depending on load and mobility, go as high as you can with your hand.
Some do it all the way up, and that's ok, it has no downsides. Most others lift their hand up roughly to shoulder height, and some, due to lifting very heavy loads, stop slightly short of their horizontal shoulder height.
It's all ok.
No need to squeeze at the top, unless weights are so low that you need to squeeze to get a good enough stimulus.
Control the descent down, all the way to that starting position, breathe in for a second, and repeat until you reach that RIR 0 to 4.
Once done, rest for a few seconds until you have caught your breath, and do the other side.
Coaching cues, rear shoulder raise/row.
The rear shoulder raise is a wolf in disguise.
It can be a gentle exercise that you do with nothing more than resistance bands, just like a regular dumbbell rear shoulder raise. Or you can do the TRX version, where you lean backwards and pull your hands back and out while regulating the load via the angle you are leaning with, depicted in the image.
There´s the fantastic Meadows Row variant too, not to mention that this is one shoulder exercise where you can go ultra hard equally well with gym dumbbells or your trusty stone-filled backpack.
Do it ultra strictly, or you push that load big time, and turn this bad boy into an exhausting, shoulder-frying shoulder raise/row, which will also activate more of your upper back.
Here's how I do it, and how I coach our in-person clients.
Take a square stance, feet shoulder-width, with the dumbbell/backpack in the center of your feet, placed on the ground, slightly in front of your body.
Hip hinge down so you are standing bent over, just like a deep barbell row.
Place the non-lifting hand on your opposite leg to help you brace, since you will raise the weight laterally toward and away from the other leg with your other hand.
Start and end each rep on the ground. With your weight slightly over to the other side of the middle of your body.
Pull explosively with a nearly straight arm at the beginning of the rep, and finish each pull with a light bend in your arm at the top of your repetition.
Breathe in, and brace your core before every rep.
As you pull, raise the weight aggressively out to the side of your body. And yes, it's ok if you have some upper body movement, just don't swing too wildly. But it's ok to turn your upper body just a little bit, especially with bigger weights.
Training for performance beats hypertrophy-focused training.
As you reach the top, take absolute control of the weight and control the descent, all the way back over the middle of your body before you put the weight down on the ground again.
Once the load gets big enough in this exercise, this will work not just your rear shoulder and scapula, this exercise will work most of your core and upper back.
Once you have reached RIR 0 to 4, rest as needed and do the other side.
The two Jeff Nippard down below, especially the rear shoulder video are included because they show you some of the many ways you do approach both of these exercises. There are no singular ways to do either thats 100% the only way to do it. So think of all the exercise videos in this article as a starting point from which you can branch out and find the perfect execution, and exercise choices for your situation, and goals.
Cardio.
Once done, finish off day one with a 10 to 20-minute long sprint interval with at least 5 minutes of jogging between each 5 to 10 second sprint.
.
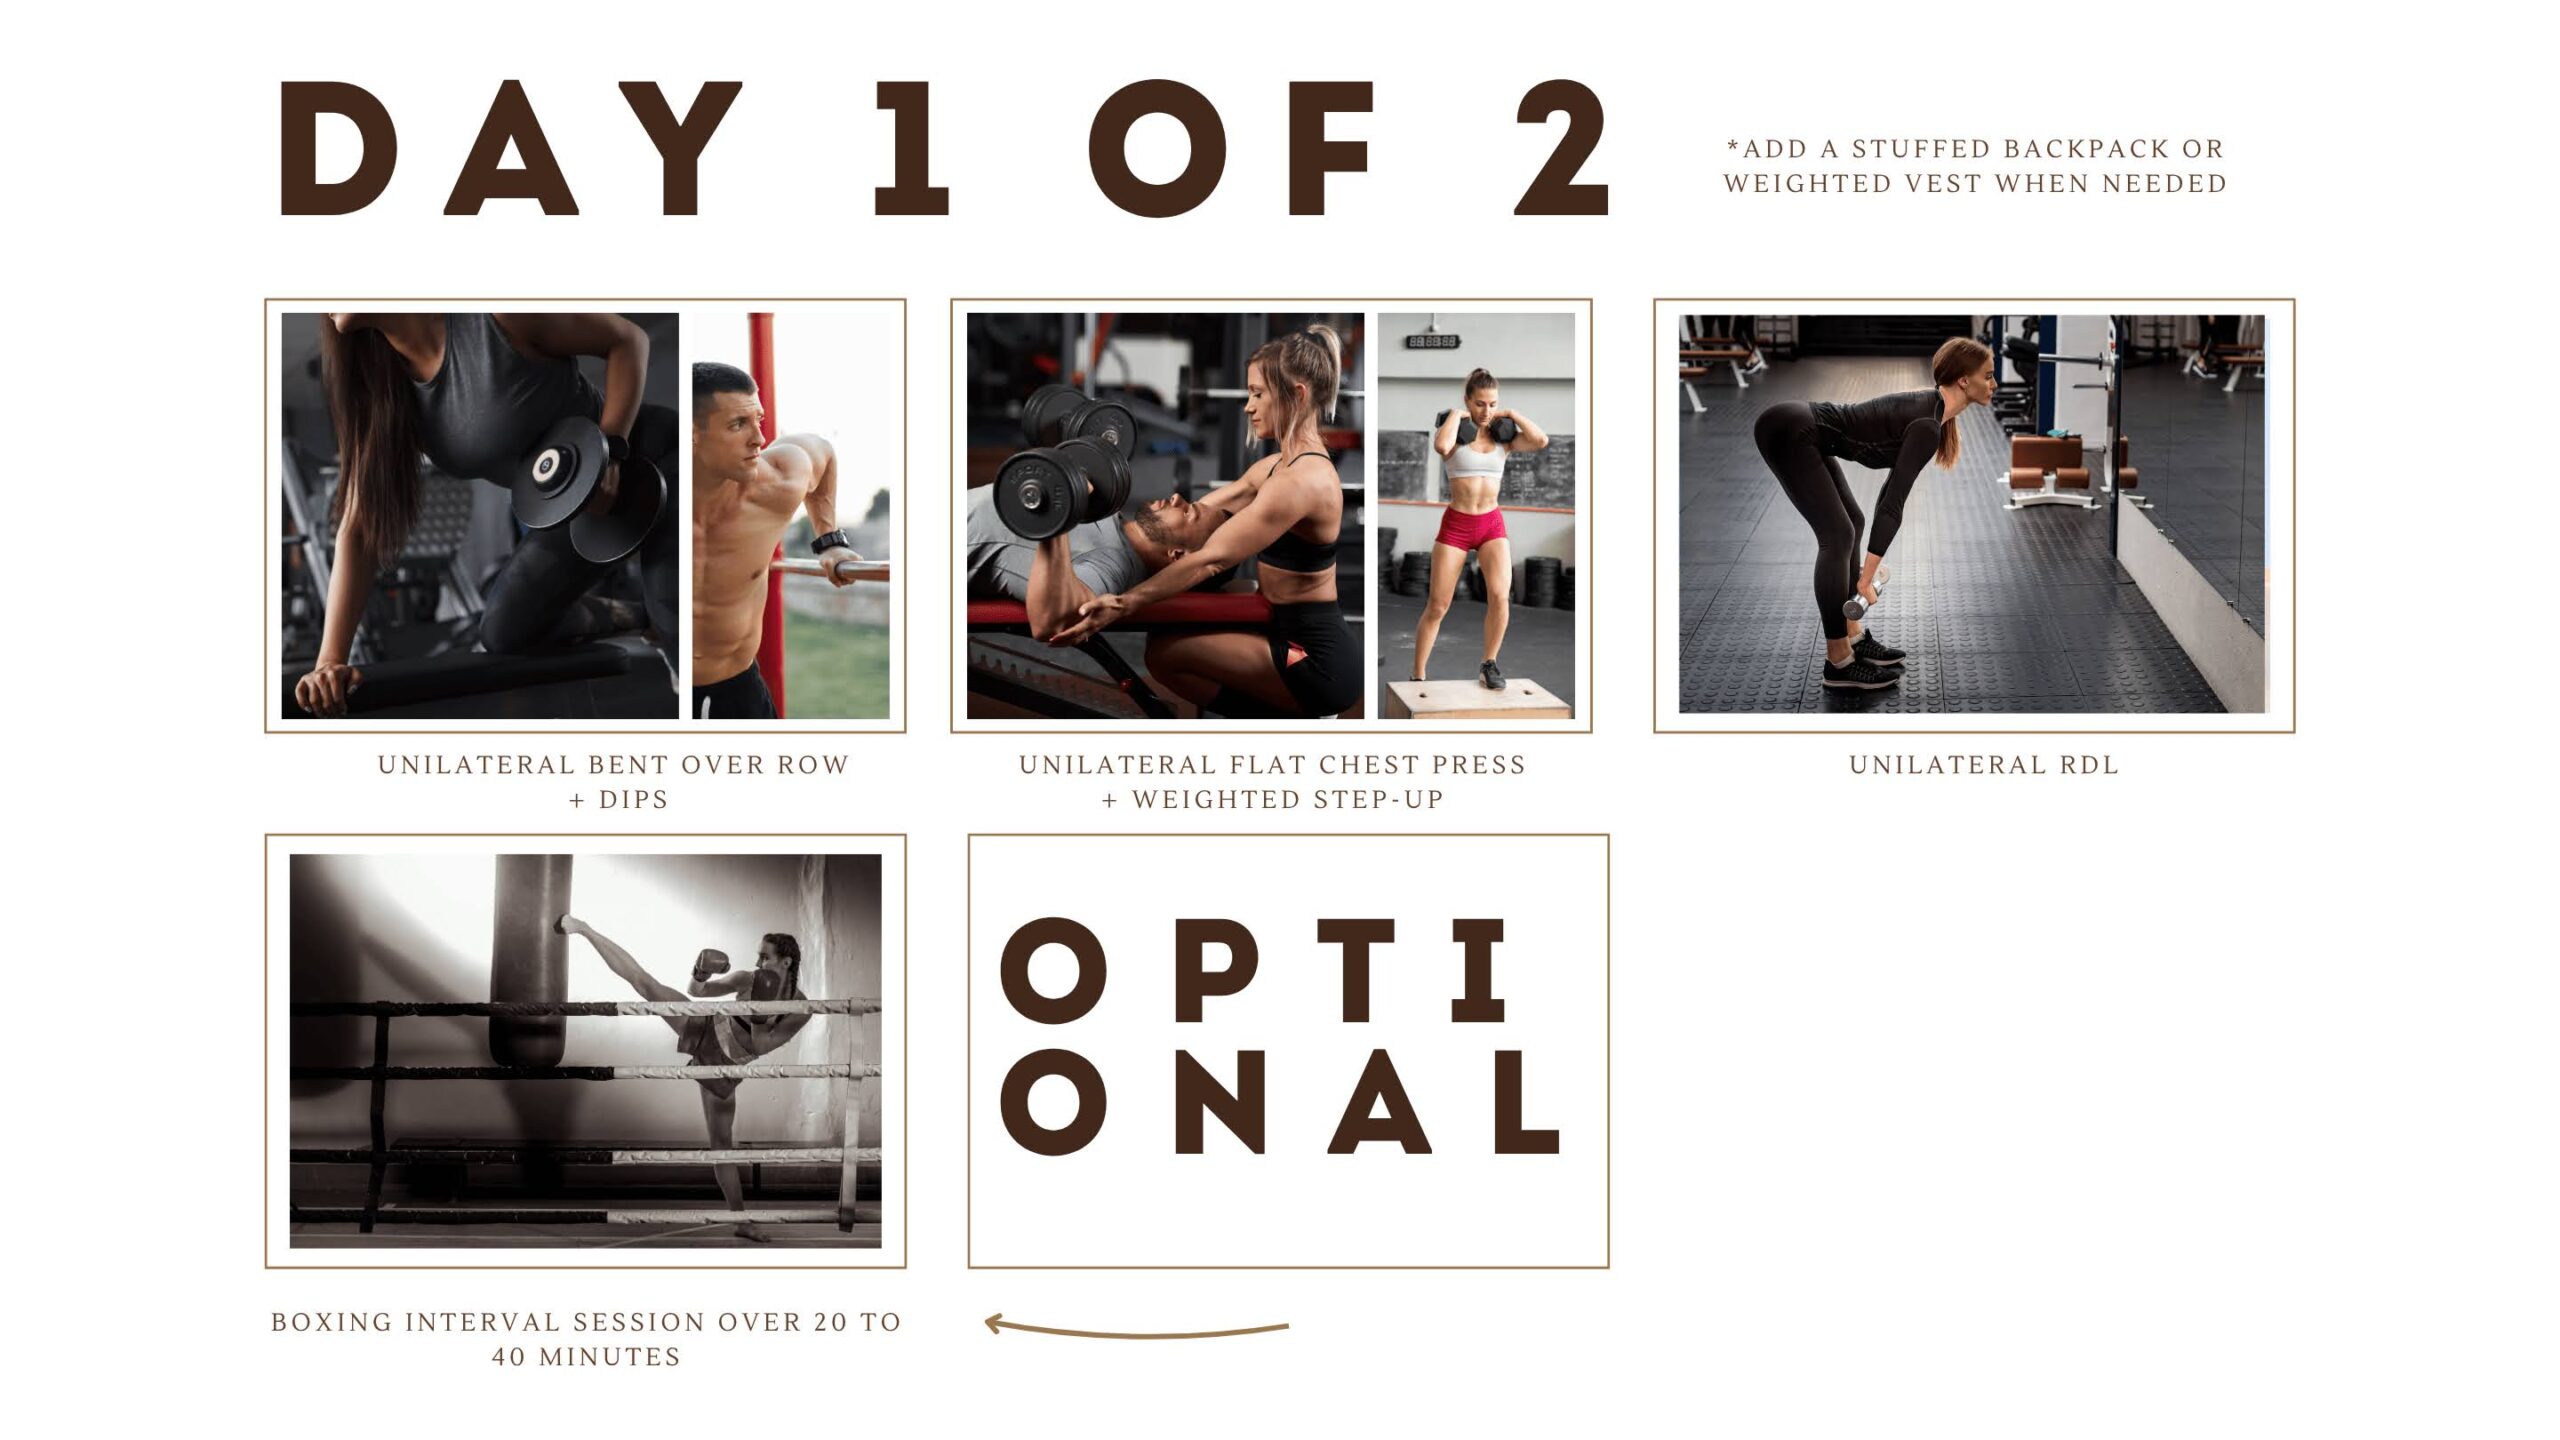
Day 1, variants 2 and 3.
Our Day 1, alternate versions include excellent exercises, such as the unilateral shoulder press exercise. Something which you can easily do with the help of your weighted backpack. But you can also make use of old school, milk farm metal containers, filling them with sand makes for amazing dumbbells or kettlebell-type exercise tools.
Unilateral shoulder press.
Feet firmly planted in the ground, a braced core, and just rep away. No need to be afraid of some momentum in this exercise. At the bottom position, your weight should rest against your chest or shoulder, and from there you breathe in, brace your core, and press that weight all the way up to one straight, strong arm.
Ideally, for the strongest and least injury-prone lift path, treat foot A as your tripod when you lift with hand A.
Foot A, hip, and hand A in one smooth vertical line, pushing the weight up, and lowering it in a controlled descent.
Unilateral Romanian Deadlift.
The unilateral Romanian deadlift is another top-notch exercise. Add weight by holding your backpack in the elbow hinge of arm A, lock it up by wrapping your other arm around the lower arm of arm A.
Feet shoulder-width apart, and like a normal RDL, you hip hinge your upper body forward as you push your glutes backwards. Unlike a squat or traditional deadlift, you keep your knee hinge much straighter, although some knee bend is ok.
The difference here is that you do it one leg at a time, holding your weighted backpack in front of you or directly to the side of your standing leg.
The standing leg is what will pull the weight on its own. That's leg A. Leg B can either swing backwards in a controlled way to help with balance, or you can leave it on the ground, placed slightly retracted compared to leg A, with a light touch of your foot and relaxed hamstrings, not to contribute to the lift.
Of course, if the load is big enough, you can do it like a barbell RDL and activate both legs in a perfectly square stance.
But seeing how this is happening without access to a commercial gym, chances are likely that the unilateral version makes for a bigger challenge.
Unilateral flat chest press.
This one can be done with a dumbbell, if you have access to big enough dumbbells. If not, put that weighted backpack to good use. In every other way, it's a normal flat bench dumbbell chest press.
You are lying flat on your back, on a bench or box. Driving both feet into the ground, shoulders into the bench/box as you chest press that weighted backpack.
The more awkward volume means that it's slightly less stable than a dumbbell, so this version is actually a step up in effort. But it's the same exercise.
The backpack is more unwieldy, so hold it by the backpack straps and lie with your body slightly to the edge of the bench/box with your pressing arm so you can freely let the backpack travel up and down its full vertical path.
The unilateral nature means that you will have to keep your core more activated too, but thats another benefit.
Exercise Day 2 of the Week
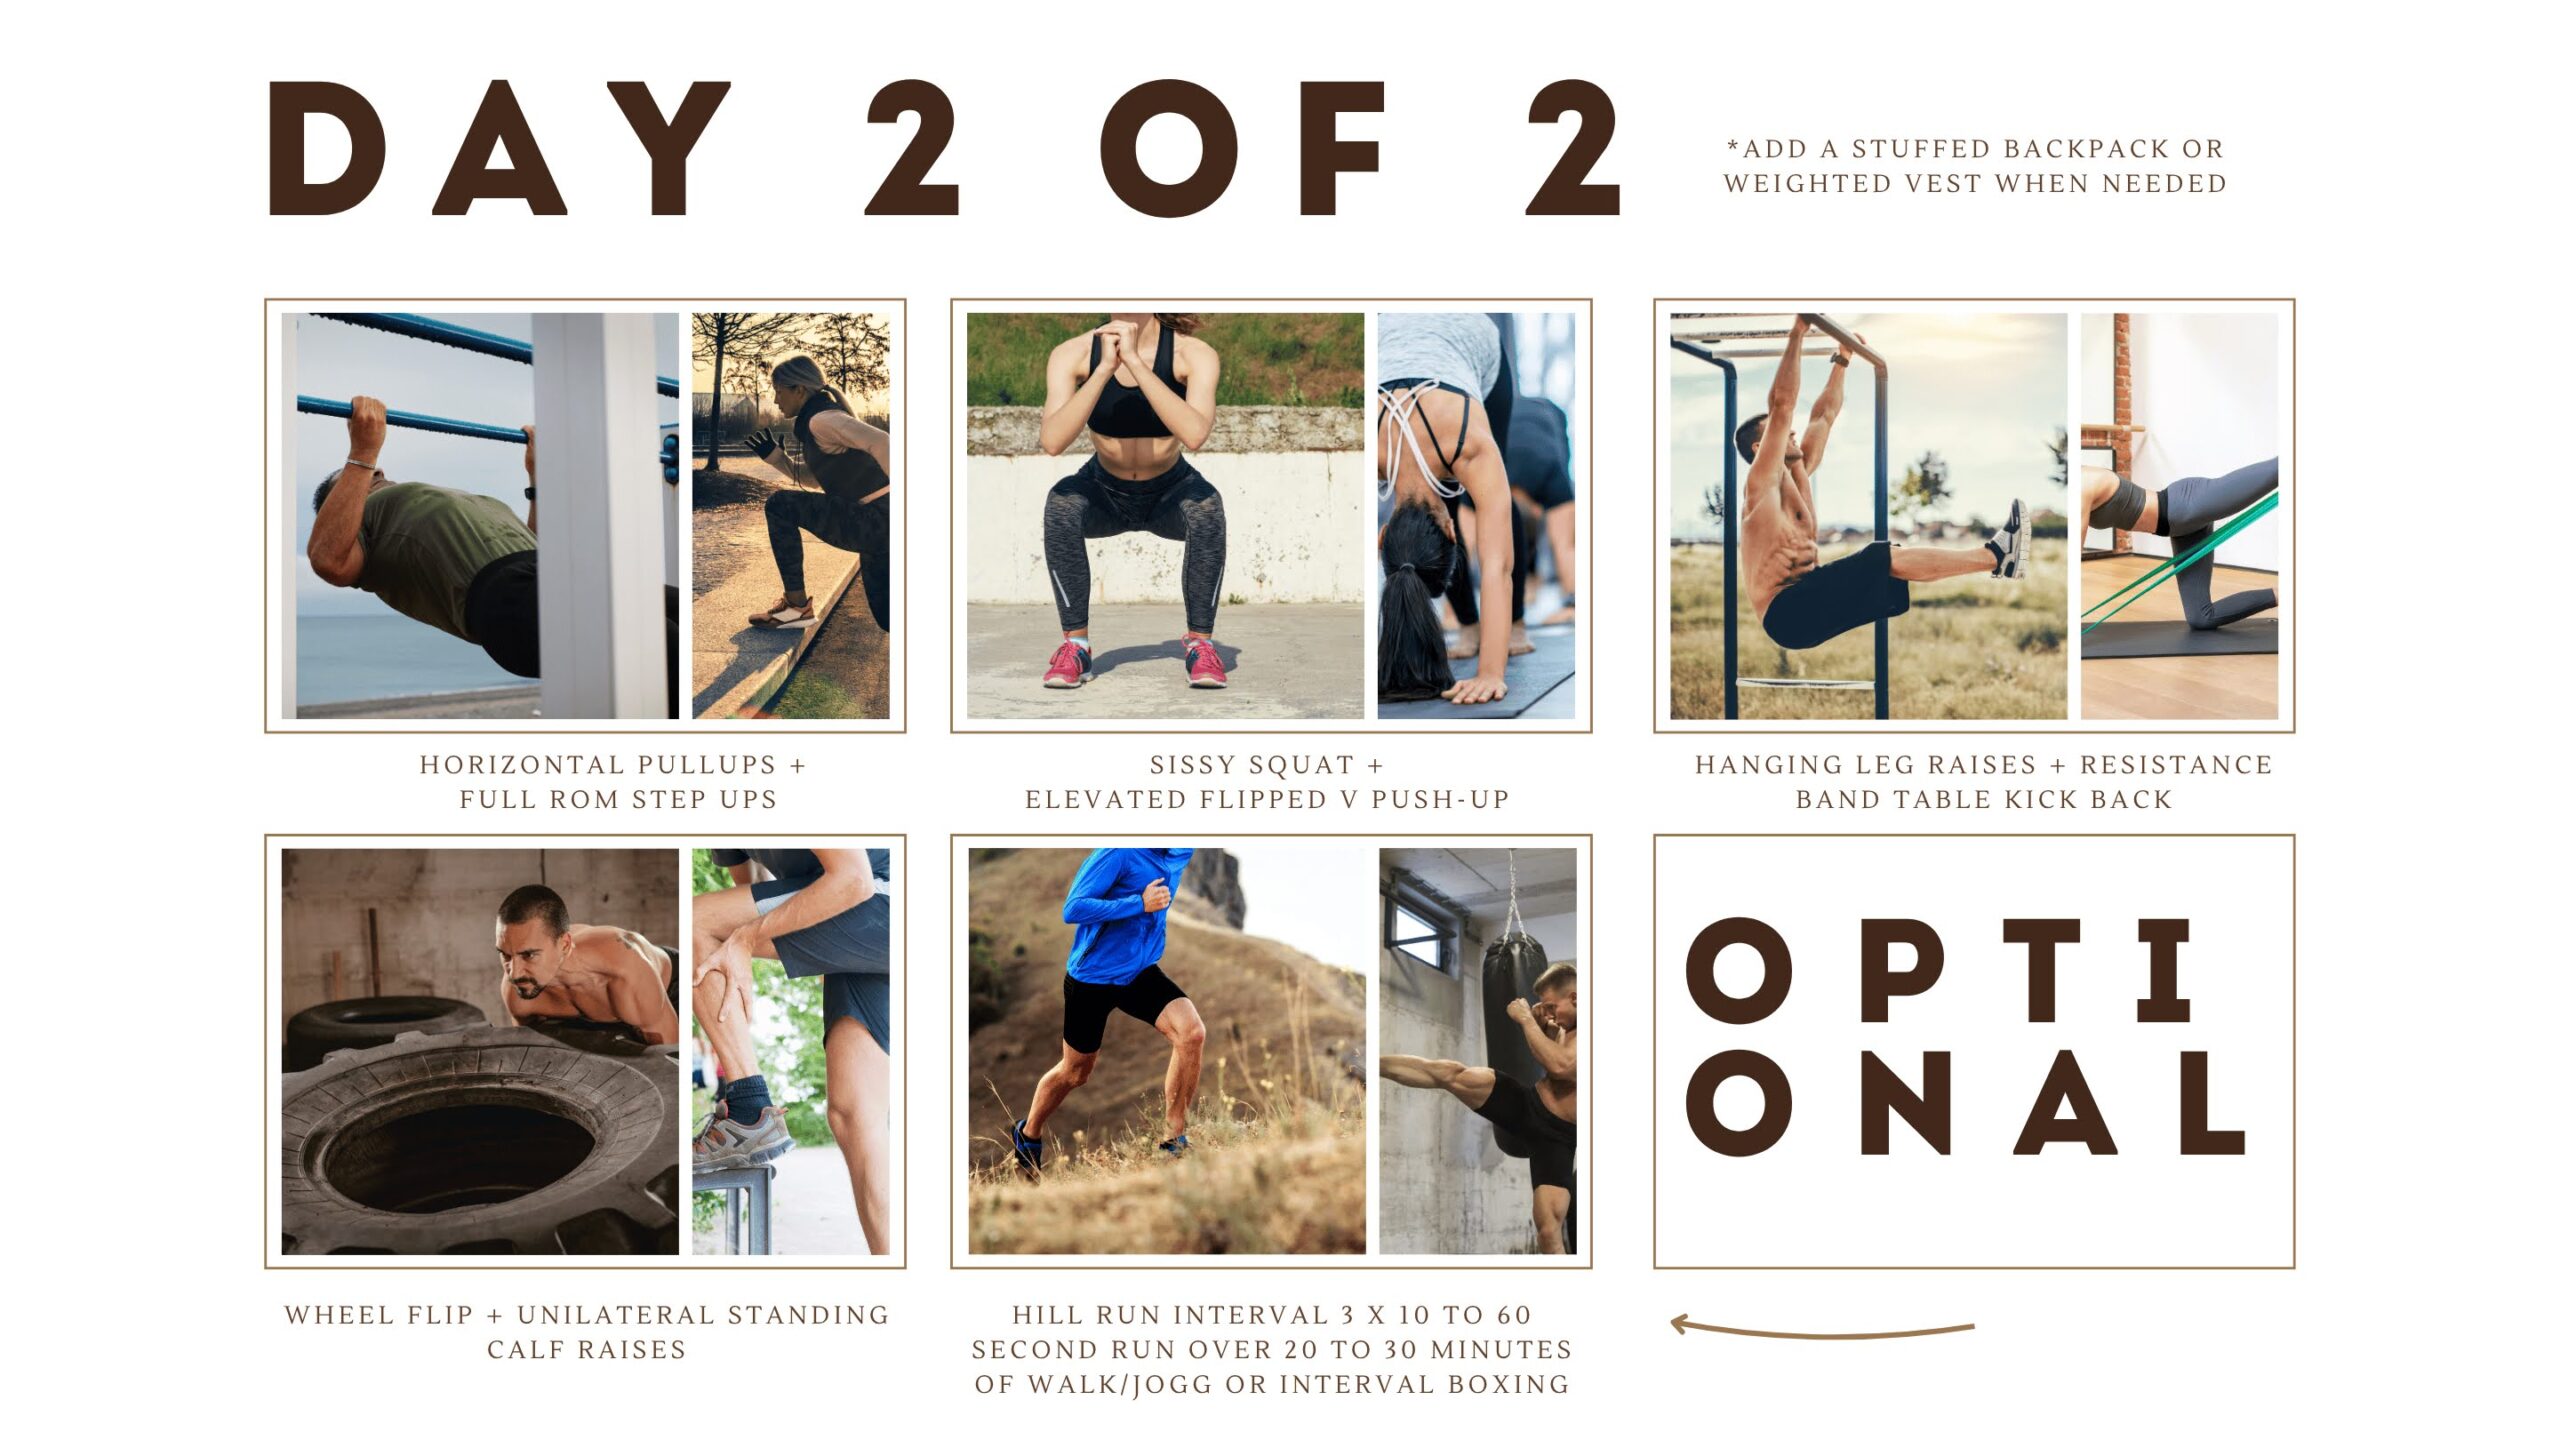
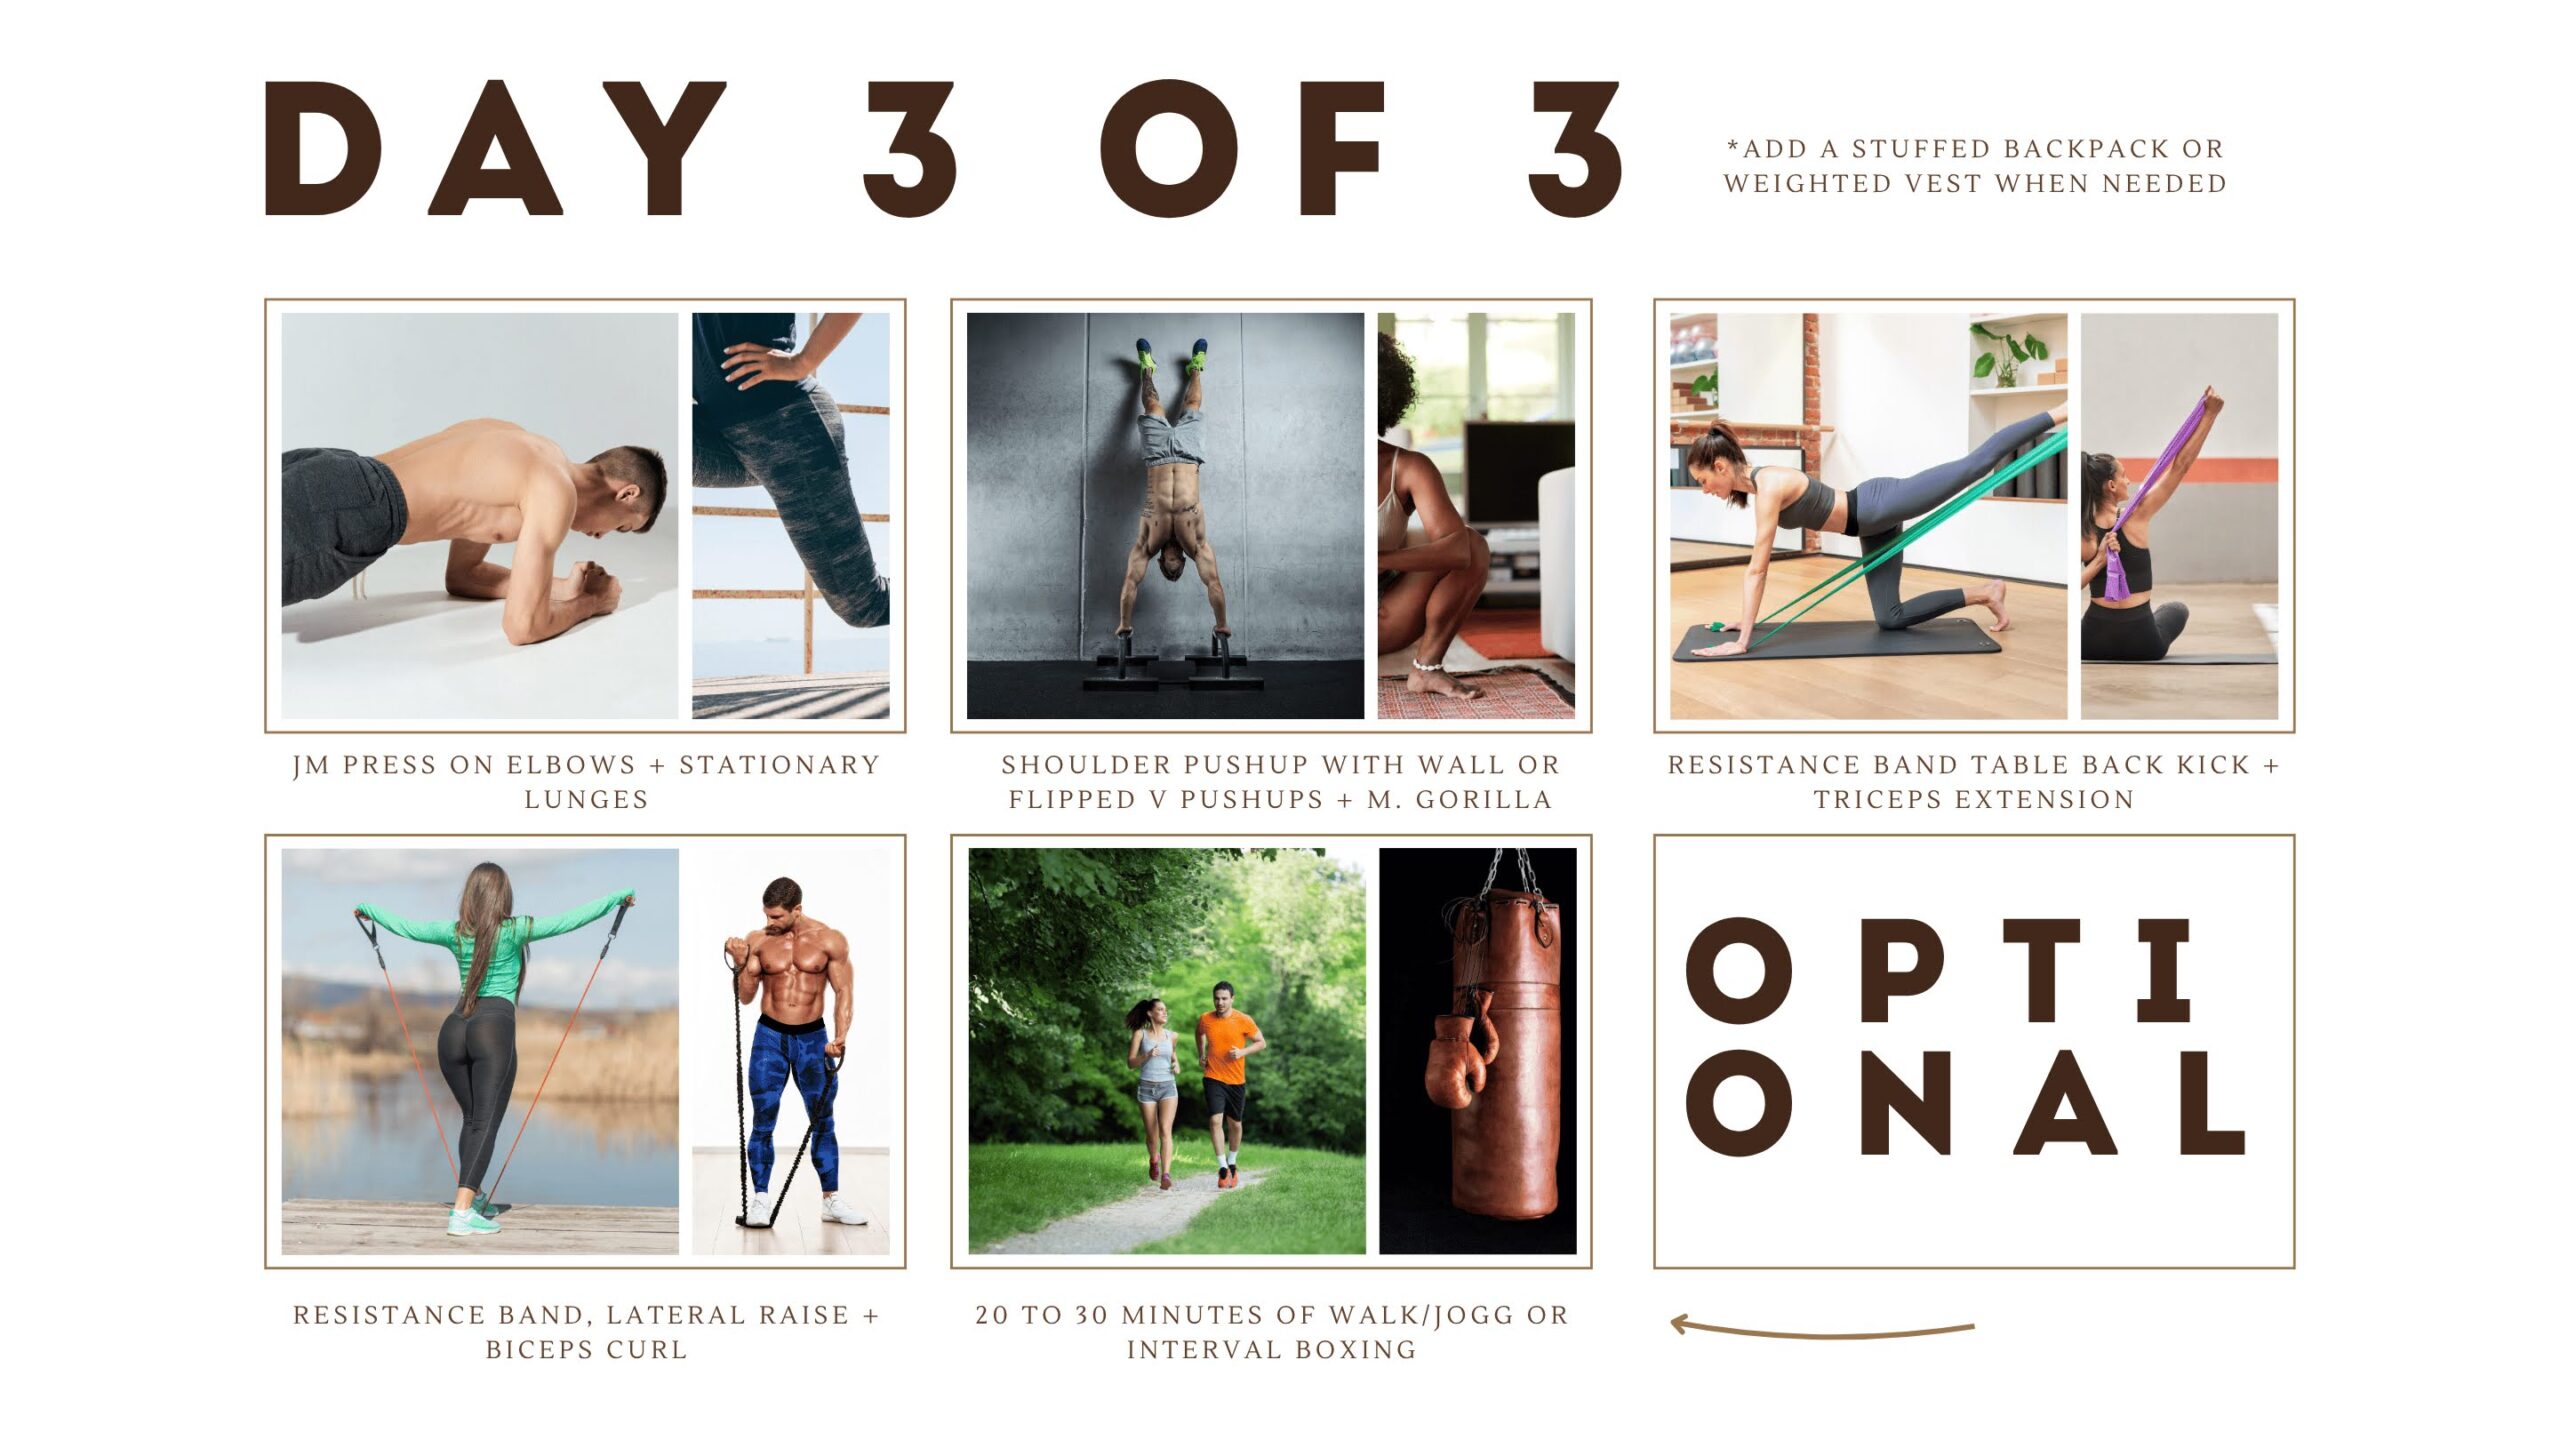
Super Set Group 1
Horizontal Pull Ups
Full Rom Step ups
Rest time between each super set.
3 set
RIR 0 to 4
3 set
RIR 0 to 4
2 to 6 minutes
Exercise Day Two and three, link down below.
I have decided to publish our public fitness plans with one individual article per exercise day. This way you wont have to scroll up and down forever to find the right exercises, coaching cues, exercise videos and so on. Each exercise day in each public fitness plan will also link to the other days of that fitness plan. And at times provide exercise variations for that day.
Making for very easy, user friendly, and structured browsing.
Fitness Plan:
Exercise days 2 & 3
Day Two
Day Three
Unless strength training is your main pillar for health, fitness, or sports performance, something beats nothing with a gigantic margin. As such, even just 20 to 40 minutes done 2/3 days per week will create substantial progression when that time is wisely spent.
Coach Mike, Strength By Fitness.
recent articles
Member Exclusive: Recovery time between high effort strength workouts before your muscle chain can perform again at the same or higher performance level?
The optimal workout frequency for the same muscle chain per week is never going to be a specific amount of hours thats the superior choice for every human being, or even the vastly better workout frequency for any individual.
Welcome to another fact-based coaching article from Strength By Fitness
Member Exclusive: Higher-SPC lower fat vs lower carb.
Lower carb or fat on a higher-SPC food plan. Welcome to another fact-based Strength By Fitness article. What matters the most as far as our food habits go are two nutritional aspects. That we avoid a perpetual energy surplus and that it provides a higher amount of nutrients per unit of energy ( higher-SPC ).

Member Exclusive: Crunchy PB Taco V03 Recipe.
Strength By Fitness higher-SPC, Crunchy PB Taco V03 recipe is loaded with yum, taste, and healthy, fitness-friendly nutrients. Also available as an omnivore version with added eggs.
Our V03 Crunchy PB Taco provides roughly 74 grams of protein, a 51 to 65 SPC range, and 30 grams of fiber.

Member Exclusive: Homemade Snickers Date Protein Bar.
Welcome to Strength By Fitness Member Exclusive: Homemade Snickers Date Protein Bar.
Rich in micronutrients, 109 protein, 41 fiber, and an SPC score of 66 to 80, make this a go-to protein bar winner that is very hard to beat.

Member Exclusive Recipe: Homemade, and health friendly peanut protein bar.
Digg into Strength By Fitness homemade and health friendly peanut protein bar. This easy to make fitness bar is rich in micronutrients, fiber and protein for every unit of energy.

Are you a non-responder? Two words: Extremely unlikely.
In this nail biting free to read, public article, Coach Mike from Strength By Fitness answers the dreaded question, “Am I a non-responder” to exercise?
Two words is enough. Extremely unlikely. But read on to get the science too.
We appreciate you
so stay healthy & never stop training
Contact
Private In-App Messaging is Available For All App + Coaching Clients
Adress
Coaching Is Available Online Via App on IOS & Google Play, and In-person, On-location.
Copyright 2026 Strength By Fitness.